GHC Carpentry Students Build Expertise in Wall Systems
Posted on: Dec, 30, 2024
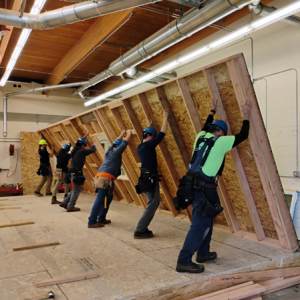
After dedicating the first half of fall quarter to learning floor systems, Grays Harbor College Carpentry students spent the remainder of the quarter expanding their skills and knowledge by focusing on wall systems.
GHC’s Carpentry students built and deconstructed two wall systems using floor plans they created. To start, the students re-identified the point of beginning at one of the building’s corners that they previously established for their floor system. “The entire build is referenced to this point,” explained Kelly Williams, Carpentry IBEST Instructor at GHC. “In the real world this starting point would be established on the blueprints by the engineer or architect and marked on the property by a surveyor or a supervisor prior to construction.”
The students verified that the floor system they built was flat, square, and at the correct dimensions. Then they measured and marked chalk lines on the floor to show the locations of the walls according to their floor plan. Next the students learned how to make a story pole, which is a stud with a small piece of plate material attached to the bottom on which the height of the various wall components are marked, such as headers and sills for doors and windows. “Builders use a story pole as a calculator to better understand the dimensions of wall components such as trimmer studs and jack studs, usually called cripples. It’s also a check-u-later,” joked Adam Pratt, Carpentry Instructor at GHC, “since it can be used as a gauge to determine if things are actually in the right place, or not, after the wall is assembled.”
The students temporarily tacked the top and bottom plates to their positions on the floor and marked where various parts and connections would be located. Then, studs and components were cut and distributed as the students moved on to assembling the wall frame.
At this point, the students moved on to sheathing. According to Williams, sheathing is a fairly simple process as long as the framing layout is correct and the wall is square. The students began by double checking the wall layout. Then, they measured the wall diagonals to ensure the wall was square. “Once the sheathing is installed, the wall is locked in,” explained Williams. “So, if you have it wrong you’re going to pay the price as you progress through the build.”
After standing up each wall the students used diagonal braces to hold it in place until all of the walls were up and fastened to one another. “We often use screws on our projects, instead of nails, with a minimal fastening pattern. This allows us to deconstruct with less damage which saves both time and materials for the next project,” shared Williams.
Once the first build was complete, Pratt evaluated the work with the entire class before the students disassembled it. After completing the second build, the students worked in pairs to assess their own work and that of their classmates. “This provides an opportunity to review building codes, perform quality control, practice constructive criticism, and develop a sense of personal accountability,” explained Pratt.
